shadowsocks 原理概述
网上关于墙的原理分析有很多不错的文章,感兴趣的可以去自己看一下。
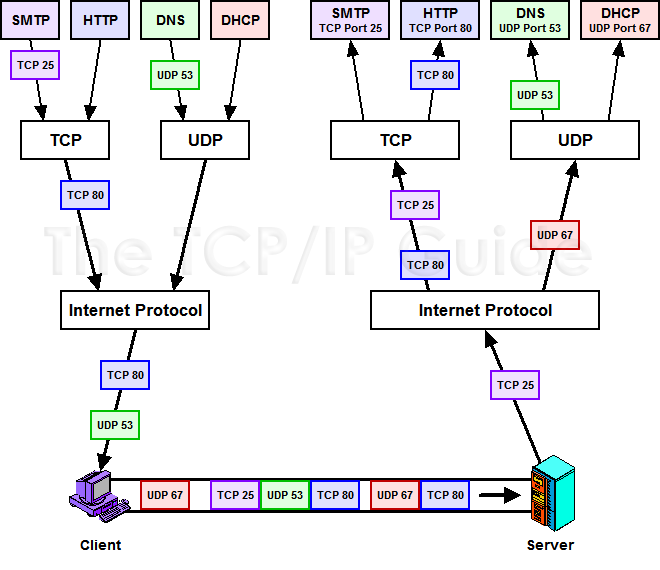
TCP/IP 协议栈,如图: 应用层的各种协议(HTTP、FTP、SMTP)都会封装后通过传输层的 TCP 或 UDP 协议建立起端到端的连接。ss-则工作在 在应用层和传输层之间做了一层封装。主要是对传输内容进行加密和解密。
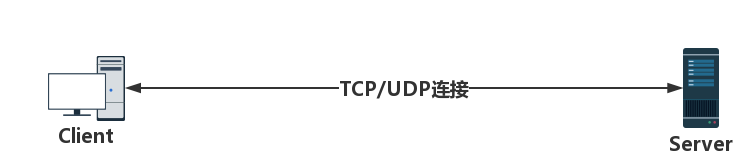
我们正常访问网站时,客户端和服务端直接建立连接。然而,在有了墙之后,访问某些网站时,墙检测到了这些流量包的特征,于是对这些流量包进行干扰。使得其不能正常的进行通信。
这张图很好的说明了SS的工作原理。 浏览器等 client 和 ss-local 建立连接, ss-local 把 收到的 client 数据包加密后发送给 ss-server 。 ss-server 再和目标地址建立正常的 TCP/UDP 连接。
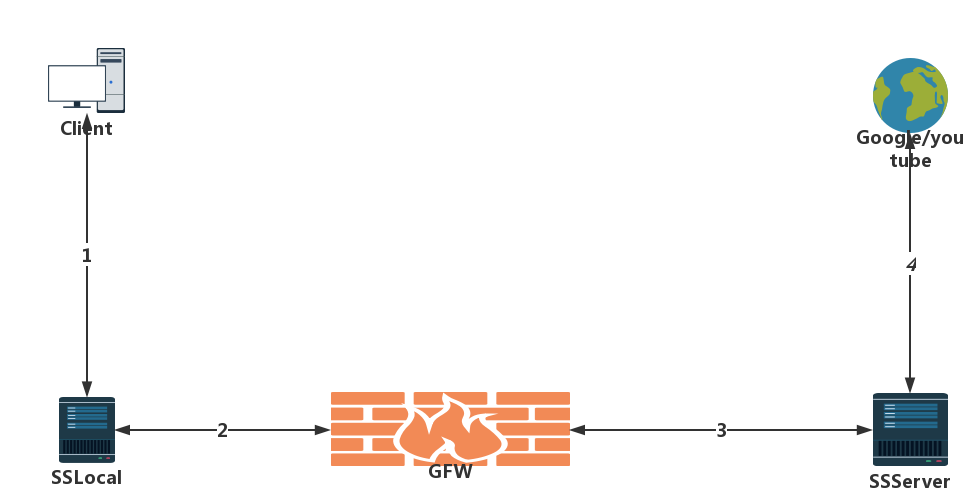
对于翻墙的关键点在于图中 2 和 3 之间。 也就是 SSLocal 和 SSServer之间采用了加密。 墙会通过一种深度包检测的技术识别 TCP 包,如果发现是翻墙的数据包则会对数据包进行干扰。 但经过加密之后,墙不能对数据进行解密,因此不能干扰通信。
ss 源码分析
ss-go 源码目录
ss-go 的源码量较少,加上测试相关的代码也就2000行左右,比python版本的精简了很多。
├─cmd
│  ├─shadowsocks-httpget
│  │      httpget.go
│  │
│  ├─shadowsocks-local
│  │      local.go                // ss-local 主程序
│  │
│  └─shadowsocks-server
│          server.go            // ss-server 主程序
│
└─shadowsocks
    │  config.go                // 配置文件解析
    │  config_test.go
    │  conn.go                    // 连接关系
    │  encrypt.go                // 编解码
    │  encrypt_test.go
    │  leakybuf.go                // 一个缓冲区的实现,可以减少内存的频繁申请和释放
    │  log.go
    │  mergesort.go
    │  pipe.go                    // 对conn的一个封装
    │  proxy.go
    └──util.go                    // 通用工具
ss-local
ss-local 的main 函数功能很简单,主要是完成配置文件的解析。其中包括 命令行和配置文件两种方式。 用到了标准库里的 flag 包来解析命令行参数。当正确解析参数之后,开始监听本地的端口。
从 main 函数开始看,main 函数的功能就是读取配置信息,然后运行监控函数
func main() {
    // 从命令行和配置文件中读取配置文件
    // 初始话日志文件等
    parseServerConfig(config)
    run(cmdLocal + ":" + strconv.Itoa(config.LocalPort))
}
开始监听端口后,每当有新的请求,开启 goroutine 处理连接。其中连接处理部分是 ss-local 的核心部分。
func run(listenAddr string) {
    ln, err := net.Listen("tcp", listenAddr)
    if err != nil {
        log.Fatal(err)
    }
    log.Printf("starting local socks5 server at %v ...\n", listenAddr)
    for {
        conn, err := ln.Accept()
        if err != nil {
            log.Println("accept:", err)
            continue
        }
        go handleConnection(conn)
    }
}
连接处理, 对每一个来自 client 的请求,ss-local 和 ss-server 建立一个连接。
func handleConnection(conn net.Conn) {
    if debug {
        debug.Printf("socks connect from %s\n", conn.RemoteAddr().String())
    }
    closed := false
    defer func() {
        if !closed {
            conn.Close()
        }
    }()

    // socks v5 的
    var err error = nil
    if err = handShake(conn); err != nil {                // 1. 处理 client 的握手请求
        log.Println("socks handshake:", err)
        return
    }
    rawaddr, addr, err := getRequest(conn)                // 2. 读取 client 的包含目标服务器地址和端口的请求
    if err != nil {
        log.Println("error getting request:", err)
        return
    }
    // Sending connection established message immediately to client.
    // This some round trip time for creating socks connection with the client.
    // But if connection failed, the client will get connection reset error.
    _, err = conn.Write([]byte{0x05, 0x00, 0x00, 0x01, 0x00, 0x00, 0x00, 0x00, 0x08, 0x43})        // 3. 回复 client request ,的reply 。 socks5 协议连接建立完成
    if err != nil {
        debug.Println("send connection confirmation:", err)
        return
    }

    remote, err := createServerConn(rawaddr, addr)                    // 4. 和 ss-server 建立连接
    if err != nil {
        if len(servers.srvCipher) > 1 {
            log.Println("Failed connect to all avaiable shadowsocks server")
        }
        return
    }
    defer func() {
        if !closed {
            remote.Close()
        }
    }()

    go ss.PipeThenClose(conn, remote)            // 5. 把收到的 client 的数据全部加密后转发给 ss-server
    ss.PipeThenClose(remote, conn)                // 6. 把收到的 ss-server 的数据解密后转发给 client
    closed = true
    debug.Println("closed connection to", addr)
}
本地浏览器上如果装了 switch-omega 等插件,通过 socks v5 协议和 ss-local 进行交互。(socks v5 是一种常用的代理协议,很多程序都支持,比如网易云音乐、QQ、dropbox等)。
连接的建立
client 与 ss-local 握手
client 先向 ss-local 发送一个 握手包, ss-local 回复协议版本号完成握手请求。
+----+----------+----------+
|VER | NMETHODS | METHODS  |
+----+----------+----------+
| 1  |    1     | 1 to 255 |
+----+----------+----------+
包的内容就是 一个字节的版本信息, 用 4 和 5 两种。 然后一个字节的认证方法长度, 后面再有 1~ 255 字节的参数。 ss-local 收到握手包之后,回复给 client 一个版本号。至此握手完成。
func handShake(conn net.Conn) (err error) {
    const (
        idVer     = 0
        idNmethod = 1
    )
    // version identification and method selection message in theory can have
    // at most 256 methods, plus version and nmethod field in total 258 bytes
    // the current rfc defines only 3 authentication methods (plus 2 reserved),
    // so it won't be such long in practice

    buf := make([]byte, 258)

    var n int
    ss.SetReadTimeout(conn)
    // make sure we get the nmethod field
    if n, err = io.ReadAtLeast(conn, buf, idNmethod+1); err != nil {    // 至少读两个字节,确保 VER 和 NMETHODS 被读取
        return
    }
    if buf[idVer] != socksVer5 {
        return errVer
    }
    nmethod := int(buf[idNmethod])
    msgLen := nmethod + 2
    if n == msgLen { // handshake done, common case
        // do nothing, jump directly to send confirmation
    } else if n < msgLen { // has more methods to read, rare case
        if _, err = io.ReadFull(conn, buf[n:msgLen]); err != nil {        // 读取剩下的参数
            return
        }
    } else { // error, should not get extra data
        return errAuthExtraData
    }
    // send confirmation: version 5, no authentication required
    _, err = conn.Write([]byte{socksVer5, 0})                    // 回复 client 版本信息
    return
}
连接请求和回应
握手完成后, client 向sslocal 发送一个带有目标地址和端口的请求包, ss-local 收到请求之后回复给 client 建立连接的确认信息。
 +----+-----+-------+------+----------+----------+
|VER | CMD |  RSV  | ATYP | DST.ADDR | DST.PORT |
+----+-----+-------+------+----------+----------+
| 1  |  1  | X'00' |  1   | Variable |    2     |
+----+-----+-------+------+----------+----------+
其中 一个字节的 VER 信息,一个字节的 CMD(connect 0x01, bind Ox02, UDP ASSOCIATE 0x03 ),一个字节的保留字段,一个字节的地址类型字段(ipv4 ipv6 域名 三种),不定长的服务器地址(ipv4和ipv6有相应的长度,地址是域名的情况下第一个字节是域名长度),以及两个字节的端口号。 ss-local 收到请求包之后,马上返回给 client 一个回应消息,代表 client 和 ss-local 之间的 socks 5 代理成功建立。 其中 REPLY 包的协议格式是: REP 字段代表各种信息。 ss-go 的代码中直接回复了 0x00(succeeded)。
 +----+-----+-------+------+----------+----------+
|VER | REP |  RSV  | ATYP | BND.ADDR | BND.PORT |
+----+-----+-------+------+----------+----------+
| 1  |  1  | X'00' |  1   | Variable |    2     |
+----+-----+-------+------+----------+----------+
数据的处理
ss-local 和 client 之间的连接建立好了之后, ss-local 和 ss-server 建立连接。 之后ss-local 负责把 client 的数据包加密后发送给 ss-server。把收到的 ss-server 的数据包发给 client
go ss.PipeThenClose(conn, remote)            // 5. 把收到的 client 的数据全部加密后转发给 ss-server
ss.PipeThenClose(remote, conn)                // 6. 把收到的 ss-server 的数据解密后转发给 client
PipeThenClose 的逻辑是 申请一块缓冲区(这里用的是) 然后不停的从 src 中读取数据,将数据转发到 dst 中。 当然,读取的时候需要对数据进行解密,写的时候需要对数据进行加密
// PipeThenClose copies data from src to dst, closes dst when done.
func PipeThenClose(src, dst net.Conn) {
    defer dst.Close()
    buf := leakyBuf.Get()                // 申请一块内存
    defer leakyBuf.Put(buf)                // 当结束之后释放内存
    for {
        SetReadTimeout(src)
        n, err := src.Read(buf)        / 从 src 中读取数据 ,在 ss-local 中是读取来自 client的数据。此处不需要解密
        // read may return EOF with n > 0
        // should always process n > 0 bytes before handling error
        if n > 0 {
            // Note: avoid overwrite err returned by Read.
            if _, err := dst.Write(buf[0:n]); err != nil {     /
                Debug.Println("write:", err)
                break
            }
        }
        if err != nil {
            // Always "use of closed network connection", but no easy way to
            // identify this specific error. So just leave the error along for now.
            // More info here: https://code.google.com/p/go/issues/detail?id=4373
            /*
                if bool(Debug) && err != io.EOF {
                    Debug.Println("read:", err)
                }
            */
            break
        }
    }
}
Read and Write
PipeThenClose conn.go 中 ss-local 和 ss-server 的 Conn 重写了Read 和 Write 函数, 其中 Read() 在读取数据之后会根据加密方法对数据进行解码。 Write () 则会在写之前先对数据进行加密。 ss-local 和 client 之间的 conn 则直接进行数据的读写。
func (c *Conn) Read(b []byte) (n int, err error) {

    //  如果解码器为空,那么初始化解码器
    if c.dec == nil {
        iv := make([]byte, c.info.ivLen)
        if _, err = io.ReadFull(c.Conn, iv); err != nil {
            return
        }
        if err = c.initDecrypt(iv); err != nil {
            return
        }
        if len(c.iv) == 0 {
            c.iv = iv
        }
    }

    cipherData := c.readBuf
    if len(b) > len(cipherData) {
        cipherData = make([]byte, len(b))
    } else {
        cipherData = cipherData[:len(b)]
    }
    // 从 conn 中读取数据
    n, err = c.Conn.Read(cipherData)
    if n > 0 { // 读取的数据不为空, 解码数据
        client - ss-local 的 conn 就是 net.Conn
        c.decrypt(b[0:n], cipherData[0:n])        // 解码数据
    }
    return
}
Write 与 Read 的逻辑类类似。 此外 encrypt.go 中封装了crypto 包中各种加密和解密方式。会根据配置文件或者命令行参数中的加密方式来对数据流编码或者解码。
ss-server
ss-server 和 ss-local 的逻辑差不多, 在建立连接的阶段没有 handshake 协议, 收到 client 经由 ss-local 发送来的目标地址和端口,和目标地址建立连接,将收到的数据经由 ss-local 发送到 client。
总结
阅读源码对于提升自己是很有帮助的,之前自己就简单的看了一下源码。但是如果不认真去分析的话很多细节就没搞清楚。 现在源码中还有一些不是特别明白的地方。接下来找时间继续阅读。前段时间计划的 redis cluster 计划也一直没有动手。 接下来打算看看 grpc 的源码。再写一篇关于redis 分布式锁的文章。 刚开始写 blog 不到一个月,但是感觉在这过程中自己真的有一定的提升,像之前那样只看不动手不思考的学习效率真的很低。虽然觉得现在自己的文章条理不是很清晰,但是不坚持写下去的话也就不会进步啊(笑)~